Introduction
 Ubuntu, a free operating system, is one of the top Linux distributions ranked at DistroWatch.
The operating system used to ship with GNOME desktop environment (version 2) then switched over to the Unity desktop in 2010. However, it shifted its default desktop back to GNOME using version 3 with the recent release of Ubuntu 18.04 LTS ("Long Term Support").
The tips and tricks included in this article work well with Ubuntu 18.04. See this article if you're using an older version of Ubuntu based on the Unity desktop.
Looking for a desktop interface with a start menu that looks closer to the traditional Windows system? Then give Linux Mint a try and check out Tips and Tricks for Linux Mint 18 Cinnamon Edition or MATE Edition.
Adjust the Dock-styled Launcher
Ubuntu includes a dock-styled launcher (also known as "dock") on the left of your screen. If you don't like its position and the size of the icons on the launcher, you can adjust it easily through the settings.
- Click the Applications button and select "Settings".
- Select "Dock" on the left column.
- On the right column, drag the slider of "Icon Size" to the left for a smaller size, or right for a bigger size; and change the dock position to the bottom or right of the screen.
Similarly you can also auto hide the dock.
Move the Applications Button to the Top or Left
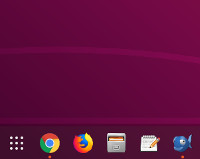 The Applications button is shown at the bottom of the dock by default. But you can move it to the top if your dock is set to the left or right of the screen; or move it to the left if your dock is set to the bottom of the screen. Ubuntu does not provide an option to change this in the settings, but you can easily do it via the Terminal.
- Press Ctrl-Alt-T to run Terminal.
- Enter gsettings set org.gnome.shell.extensions.dash-to-dock show-apps-at-top true to change the Applications button to the top (or to the left of the horizontal dock).
- Enter gsettings set org.gnome.shell.extensions.dash-to-dock show-apps-at-top false to change the Applications button back to the bottom (or to the right of the horizontal dock).
Open Up a Window in Center
When you run an application without maximized, you may see that the system always puts it near the left-top corner of the desktop, but you are allowed to set a program window to open up in the center of the desktop area.
- Search and install Dconf Editor from Ubuntu Software if the editor is not available in your system.
- Launch Dconf Editor and go to /org/gnome/mutter/
- Turn on "center-new-windows".
Ideally, the window manager in Ubuntu should restore the last known position of an application window, but it does not do that unless an application remembers its own window position.
Change Wallpapers Automatically
You can right click your desktop, select "Change Background" and choose any one of the wallpapers pre-installed, but you need to do it each time you want to change a wallpaper. What about changing a wallpaper automatically within a certain time interval? Try to install the wallpaper changer Variety.
- Press Ctrl-Alt-T to run Terminal.
- Enter sudo add-apt-repository ppa:peterlevi/ppa
- Enter sudo apt-get update
- Enter sudo apt-get install variety
With this wallpaper changer, you can change wallpapers in a fixed time interval from the sources you set and run it with several other settings such as randomly applying filter effects, color and size, customizing the indicator icon and so on.
Change a Folder Icon
When running Files Manager, you will see the default folder icons. If you wish to change a folder icon to another for it to stand out from the system-wide icons, follow these steps:
- In the Files Manager, right click a folder icon, select Properties.
- Under the Basic tab, click the icon image to open up the "Select Custom Icon" window.
- Browse to Other Locations > Computer > usr > share > icons, select an icon you want.
- Click the Open button on the top-right of the window to confirm.
Note: You can change your custom folder icon back to the default by clicking the "Revert" button in the "Select Custom Icon" window at Step 2 above.
Add or Change Keyboard Shortcuts
Keyboard shortcuts are preset in the system, but you can add new ones or change them easily. For instance, you can add a keyboard shortcut Ctrl+Alt+S to go to Settings in a few steps below:
- Go to Applications > Settings > Devices > Keyboard
- Under the Launchers in the right column, click "Settings"
- Press Ctrl+Alt+S keys simultaneously, then click "Set"
- Close the window and try the new shortcut.
![]() To disable a shortcut, press the "x" button after the step 3 above.
To disable a shortcut, press the "x" button after the step 3 above.
![]() Keyboard shortcuts can also be set by changing keybinding values with Dconf Editor, which can be installed from Ubuntu Software. In Ubuntu, press Alt+F2 and enter Dconf Editor, then navigate to org > gnome > desktop > wm > keybindings.
Keyboard shortcuts can also be set by changing keybinding values with Dconf Editor, which can be installed from Ubuntu Software. In Ubuntu, press Alt+F2 and enter Dconf Editor, then navigate to org > gnome > desktop > wm > keybindings.
Terminate Unresponsive Programs
Xkill is part of the X11 utilities pre-installed in Ubuntu and a tool for terminating misbehaving X clients or unresponsive programs. You can easily add a shortcut key to launch xkill with the steps below.
-
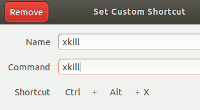 Go to Applications > Settings > Devices > Keyboard
 - In the right column "Keyboard Shortcuts", scroll down to the end and press the "+" button to create a custom shortcut.
- Enter xkill to both the Name and Command boxes.
- Click the "Set Shortcut" button, press a new key combination, e.g. Ctrl+Alt+X, then click "Add" to confirm.
Xkill is ready for use. Press the above key combination to turn the cursor to an X-sign, move the X-sign and drop it into a program interface to terminate the unresponsive program, or cancel the X-sign with a right-click.
Enable Media Playback
Ubuntu only includes completely free software by default and does not configure proprietary media formats such as mp3 and mp4 'out of the box'. The required codecs however can be easily installed for the default player to playback these files following a few simple steps below.
- Press Ctrl-Alt-T to run Terminal.
- Enter sudo apt install libdvdnav4 libdvdread4 gstreamer1.0-plugins-bad gstreamer1.0-plugins-ugly libdvd-pkg.
- Enter sudo apt install ubuntu-restricted-extras.
Install Oracle Java Packages
Other than using OpenJDK, some web services may need the Oracle Java Runtime Environment (JRE) to be installed in the system for running the services properly. If you would like to get the proprietary Oracle Java packages for your system, you can download and install them following these steps:
- Press Ctrl-Alt-T to run Terminal.
- Enter sudo add-apt-repository ppa:webupd8team/java to add the partner repository.
- Enter sudo apt-get update to update the source list.
- Enter sudo apt-get install oracle-java8-installer to download and install the Oracle Java packages.
- Enter sudo java -version to check the version of the Java used in the system.
- Enter sudo update-alternatives --config java to choose the default Java for use in the system when necessary.
Note: The new version of Oracle Java may not allow you to run applications or services that are unsigned or self-signed. If you trust the services that you're using, you may configure the security level of JRE or add the services to the Exception Site List using the Java Control Panel. To run it, enter /usr/bin/jcontrol in the Terminal, or press Alt-F2, type jcontrol then run the Oracle Java 8 Plugin Control Panel.
Auto Mount Drives at System Startup
Ubuntu is capable of reading and writing files stored on Windows formatted partitions using NTFS file system, but partitions must be 'mounted' before they can be accessed. With these steps, you can auto mount the drives or partitions without the need to manually mount them for access each time you start up the system. Below is a way of doing it by adding an entry in the fstab file.
- In the Terminal, enter sudo blkid to get the UUID (Universally Unique Identifier) of the partition you want to mount.
- Enter sudo mkdir /media/ntfs to create a mount point
-
Enter gedit admin:///etc/fstab and add the following line in the fstab file: (see Note below about gksu)
UUID=1234567890123456 /media/ntfs ntfs rw,nosuid,nodev,noatime,allow_other 0 0 - Replace the above 16-digit number with the UUID you've got from step 1, then click 'Save'.
Restart the system and check if the partition is mounted.
![]() To identify disk partitions by label, either use sudo blkid or ls /dev/disk/by-label -g in the Terminal. The "Disks" utility mentioned in "Name or Label a Partition" also gives you a glance of device numbers, partition types, sizes and labels.
To identify disk partitions by label, either use sudo blkid or ls /dev/disk/by-label -g in the Terminal. The "Disks" utility mentioned in "Name or Label a Partition" also gives you a glance of device numbers, partition types, sizes and labels.
Manually Mount a USB Drive
A USB storage device plugged into the system usually mounts automatically, but if for some reasons it doesn't automount, it's possible to manually mount it with these steps.
- Press Ctrl-Alt-T to run Terminal.
- Enter sudo mkdir /media/usb to create a mount point called usb.
- Enter sudo fdisk -l to look for the USB drive already plugged in, let's say the drive you want to mount is /dev/sdb1.
-
Enter sudo mount -t vfat /dev/sdb1 /media/usb -o uid=1000,gid=100,utf8,dmask=027,fmask=137 to mount a USB drive formatted with FAT16 or FAT32 system. OR:
Enter sudo mount -t ntfs-3g /dev/sdb1 /media/usb to mount a USB drive formatted with NTFS system.
To unmount it, just enter sudo umount /media/usb in the Terminal.
Name or Label a Partition
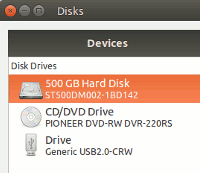 The Files Manager shows the root directory as Computer for your Ubuntu system partition. If you have other partitions (or volumes), it shows them as xx GB Volume if they’re not named or labelled.
Using Disks utility is one of the effective ways to name a partition easily:
- Go to Applications > Utilities, then click Disks to run it.
- Select the item Hard Disk.
- In the Volumes section, click a partition you want to label.
- Click the 'Additional partition options' button below the Volumes section then select "Edit Filesystem..."
- In the Label box, enter a name, e.g. Data-Disk, and click Change.
The Files Manager should now show the partition label, such as Data-Disk, instead of xx GB Volume. This tip is for naming a partition using the utility; use other advanced features such as format, edit or delete partition with caution as they can delete data on your disk.
Set Clock Time on Dual-Boot Systems
If you're dual-booting Ubuntu 18.04 and Windows 10, you may find that changing time in one system affects the other and the two systems can't display the same time.
This happens as Ubuntu interprets the hardware clock or real time clock (RTC) in universal time (UTC) by default while Windows 10 maintains the clock in local time.
You can fix this by keeping RTC in local time in Ubuntu by running a command in the terminal below.
timedatectl set-local-rtc 1 --adjust-system-clock
To undo this setting, enter the command below.
timedatectl set-local-rtc 0 --adjust-system-clock
Alternative:
As an alternative, you can also make Windows use UTC so that it's consistent with that used in Ubuntu.
Download this registry file WindowsTimeFixUTC and double click on it to run the file in Windows.
Then run this command sc config w32time start= disabled in a command prompt as an administrator to configure the Service Control in Windows so that it will not continue to write local time.
Auto Start Up an Application
In Windows, you can place a program shortcut in a startup folder for running a program automatically when the system starts. In Ubuntu, you can do the same in this way:
-
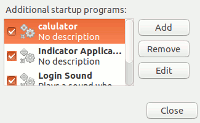 Go to Applications, click 'Startup Applications' to run it.
 - Click the "Add" button.
- Name a program.
- Click the "Browse" button and navigate to Other locations > Computer > usr > bin, where programs are usually installed.
- Select a program, click the "Open" button followed by the "Add" button.
The above program will then be listed in additional startup programs. Check if the program runs automatically by logging out and back to the system.
Clean Up Old Crash Reports
 If your Ubuntu system always pops up a dialog saying "System program problem detected" each time you log in even though you've already reported the problem, you might need to clean up all old crash reports by entering a command line below in the Terminal.
- Press Ctrl-Alt-T to run Terminal.
- Copy and paste sudo rm /var/crash/* in the Terminal and press Enter.
Log out and log back in the system, check if the dialog still appears.
Change Default Boot Options
After full installation, Ubuntu is set to be the default operating system to boot up if no key is pressed within a few seconds on a multi-boot system. You might want to set your preferred operating system to boot up by default. This can be done easily with Grub Customizer.
Press Ctrl-Alt-T to call up Terminal, copy following codes and paste (Ctrl-Shift-V) them inside Terminal to install Grub Customizer.
- sudo add-apt-repository ppa:danielrichter2007/grub-customizer
- sudo apt-get update
- sudo apt-get install grub-customizer
After installation, run Grub Customizer to set the default boot options with the following steps.
- Press Alt-F2, type grub-customizer into the box and press Enter to run it.
- Under the "General Settings" tab, select the default entry you like to boot up from the drop-down menu.
- Adjust the timeout value if needed, then press the Close button and the Save button.
Avoid changing timeout to 0 seconds if you need to select a system to boot up from a multi-boot menu.
Auto Shutdown the System
A simple command can be entered in the Terminal to schedule a time for the system to shut down.
- Press Ctrl-Alt-T to run Terminal.
-
Enter sudo shutdown -h +m (replace m with the number of minutes, e.g. +60).
OR: enter sudo shutdown -h hh:mm (replace hh:mm with the time on the 24hr clock, e.g. 23:15). - Enter password and minimize the Terminal window.
The system will then shut down within the minutes or at the time specified. To cancel a scheduled time, enter sudo shutdown -c in the Terminal.
![]() Alternatively, you might want to download and install GShutdown, which is a GUI program for scheduling a time to shutdown the system.
Alternatively, you might want to download and install GShutdown, which is a GUI program for scheduling a time to shutdown the system.
Install GNOME Tweak Tool
The Tweaks app, also known as the "GNOME Tweak Tool", is a great tool to access an array of settings and options that are not available in the standard Settings in Ubuntu.
With Tweaks, you can change GTK theme, hide icons on the desktop, enable 'battery percentage' in the top bar, change system fonts, manage GNOME extensions and a lot more.
Click here to install the GNOME Tweaks app, or you can get a published version of the binary package from here.
Explore GNOME Extensions
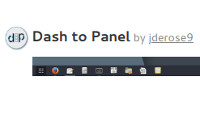 Ubuntu’s switch to the GNOME Shell desktop is a good news. It allows you to install hundreds of awesome extensions that are freely available on the GNOME Extensions website to add extra features and functionality to Ubuntu system.
Like web browser add-ons, you can install GNOME Extensions using a browser including Firefox or Chrome.
To get started, you will need to do these:
- Install this extension "GNOME Shell integration" to Chrome or to Firefox
- Click here to install the package "chrome-gnome-shell", or install a published version of the binary package from here, which provides a native host connector that talks with the browser extension for Chrome and Firefox.
After which, you can browse the GNOME Extensions website using Chrome or Firefox. Simply slide the toggle button from "off" to "on", then click the "Install" button to confirm installation.
Among the GNOME extensions, these are absolutely worth a try:
- Dash to Panel combines top bar and the dock into a single panel.
- Appfolders Management, an easy way to manage shortcuts and group apps into folders in the Applications view.
- Frippery Applications Menu replaces Activities button with an Applications menu to access apps by category.
- Gno-Menu gives you a traditional menu to access apps by category.
- GSConnect connects Android to Ubuntu desktop wirelessly.
- Applications Overview Tooltip shows a tooltip over application icons with complete name and description in the Applications view.
- More columns in applications view, reduce or increase the default 6 columns of app icons or shortcuts in the Applications view.
Add More Useful Software
Ubuntu Software lets you search and get more software. You can either click the Ubuntu Software icon from the Launcher to search for applications, or go to the Snap Store to find more snaps, which are containerised software packages that are simple to install, safe to run and work on all major Linux systems without modification.
See also our Best Free Software for Linux.
Related Links
- Tips and Tricks for Linux Mint after installation [Mint 18 - Cinnamon Edition]
- Tips and Tricks for Linux Mint after installation [Mint 18 - MATE Edition]
- Tips and Tricks for Ubuntu after Installation [Ubuntu 16.04.1]
- Easy Way to Install Ubuntu - from within Windows
- Best Free Software for Linux
Editor
This category is maintained by volunteer editor Jojo Yee. Registered members can contact the editor with comments or suggestions by clicking here. You can visit the Google+ profile page of Jojo Yee here.
Back to the top of the article
 We are looking for people with skills or interest in the following areas:

Comments
Check the link for the 'GetDeb Repository' - It's broken. Plus, the web site is really weird - It looks like they transferred a lot of old entries to make it look like a well established blog. There's a recent entry about a new browser called Flock. Flock was a Firefox fork that died a very long time ago.
Thanks! I'm always on the prowl for nifty little tools and tweaks. You guys have been awesome for so long!